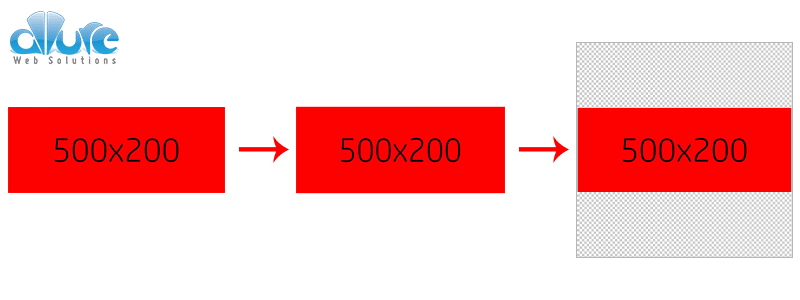
In this blog post, I will show you how to automatically resize the canvas size of non-square images using an AppleScript. With this method, the proportions of the image stay the same, but an empty white background will be added to the empty canvas space that filled in the space to make the image have square dimensions.
Step 2
For this you will need Photoshop and a Mac.
- Put all of your images in a folder
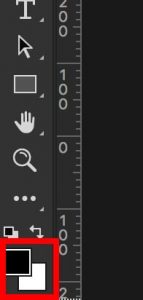
- Open Photoshop and make sure that you have black the default foreground/background colors selected (black/white)
- Open the AppleScript Editor
- Paste in the below script and click the play button
- It may ask you to select your application if it differs from the one written in the script
- Then it will ask you to select the folder where you put your photos
That’s it!
The AppleScript for resizing your image canvas to square:
set theFolder to (choose folder) as text
set theList to list folder theFolder without invisibles

repeat with theItem from 1 to count of theList
	set PicName to item theItem of theList
	set PicPath to theFolder & PicName
	tell application "Adobe Photoshop CC 2015"
		activate
		try
			open file PicPath
			set thisdoc to current document
			set docHeight to height of thisdoc
			set docWidth to width of thisdoc
			set display dialogs to never
			tell thisdoc
				if docHeight > docWidth then
					resize canvas width docHeight anchor position middle center
				else
					resize canvas height docWidth anchor position middle center
				end if

				save
				close
			end tell
		end try
	end tell

end repeat

# Credit: http://macscripter.net/viewtopic.php?pid=133168#p133168
Next steps
After you have your image canvas resized, you may want to remove the white edges and turn the white to transparent. For that, you would run the below command in terminal inside the folder where your images are located (we are assuming your photos have the extension .jpg. You will need to have ImageMagick installed for this. Check out my tutorial on installing ImageMagick and converting white backgrounds to transparent.
find . -type f -name "*.jpg" -print0 | while IFS= read -r -d $'\0' file; do convert -verbose "$file" -transparent white "$file.png"; done
That was awesome! Thanks so much! Worked perfectly for me after going crazy trying various scripts that all had errors on my mac. I send you good karma! 🙂
@Brany
I’m glad it was useful for you! Thanks for commenting and sending good karma 🙂
Still works like a charm in 2020! Thank you very much!
Continues to work brilliantly in 2023!! Many thanks!